domingo, 26 de diciembre de 2010

happy new year 2011- Feliz año 2011

feliz navidad 2010

Os deseo una feliz navidad y que se cumplan vuestros deseos para el año 2011.

I wish you a merry Christmas and fulfilling your wishes for 2011.

viernes, 17 de diciembre de 2010

woman eyes proccess / ojos de mujer, proccess

woman eyes proccess

He intentado darle al iris una degradación en el color siendo la parte de arriba mas oscura que la de abajo. Así intento conseguir dar vida a los ojos. También me gusta añadir un punto de luz.

I've tried to give the iris color degradation. In the top being darker than the bottom. I've tried to get give life to the eyes. I also like to add a point of light at the eye.

domingo, 12 de diciembre de 2010

sketch - Boceto


Intento de vez en cuando sentarme para preparar los siguientes dibujos. Es importante ver el encaje antes de ponerse a dibujar. Elegir el tamaño, lo que quieres que se vea, lo que no. Como si fueras a hacer una fotografía. No siempre dibujo todo lo que boceto pero me gusta tener unos cuantos para cuando no se que dibujar.


Sometimes I sit down to prepare the following drawings. It is important to see the socket before starting to draw. I like to choose the size of the paper, or what I want to see it the drawing and what not. As if you were to take a picture. I don't draw every sketch I do but I like to have a few of them to take a look.

domingo, 28 de noviembre de 2010

twinkle in the eye/brillo en los ojos

brillo en los ojos

Como se puede ver, los dos dibujos son el mismo. La única diferencia es que en el dibujo terminado (el de abajo) le he añadido un brillo. El brillo le da volumen al ojo y en mi opinión un poco de vida. A veces son los pequeños detalles los que mejoran un dibujo aunque es cuestión de gustos.

As you can see, the two drawings are the same. The only difference is that in the finished drawing (bottom) I have added a bright dot. The gloss gives volume to the eye and in my opinion some life. Sometimes it's the little details that enhance a drawing but it's only my opinion.

sábado, 20 de noviembre de 2010

drawing proccess / dibujo: proceso

autumn proccess

Quería dibujar un detalle y no un dibujo completo y creo que lo he conseguido.

I wanted to draw a detail and not a complete drawing and I think I succeeded.

jueves, 11 de noviembre de 2010

goddess, proccess / diosa, proceso.

proccess goddess
Aquí dejo el proceso de mi último dibujo. Se puede ver como en la segunda fase cambié la anchura de la cara aunque luego lo rectifique.

Here is the process of my last drawing. You can see how the second phase changed the width of the face but then I rectified it.

domingo, 31 de octubre de 2010

comic making of - proceso de trabajo del comic

comic-making of

comic - making of II

Me han preguntado como hago los comics. Voy a intentar contar el proceso de ejecución lo mas breve que pueda:
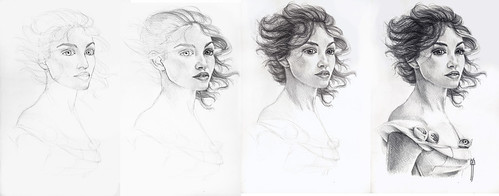
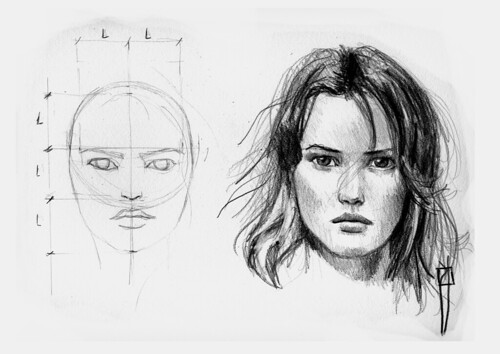
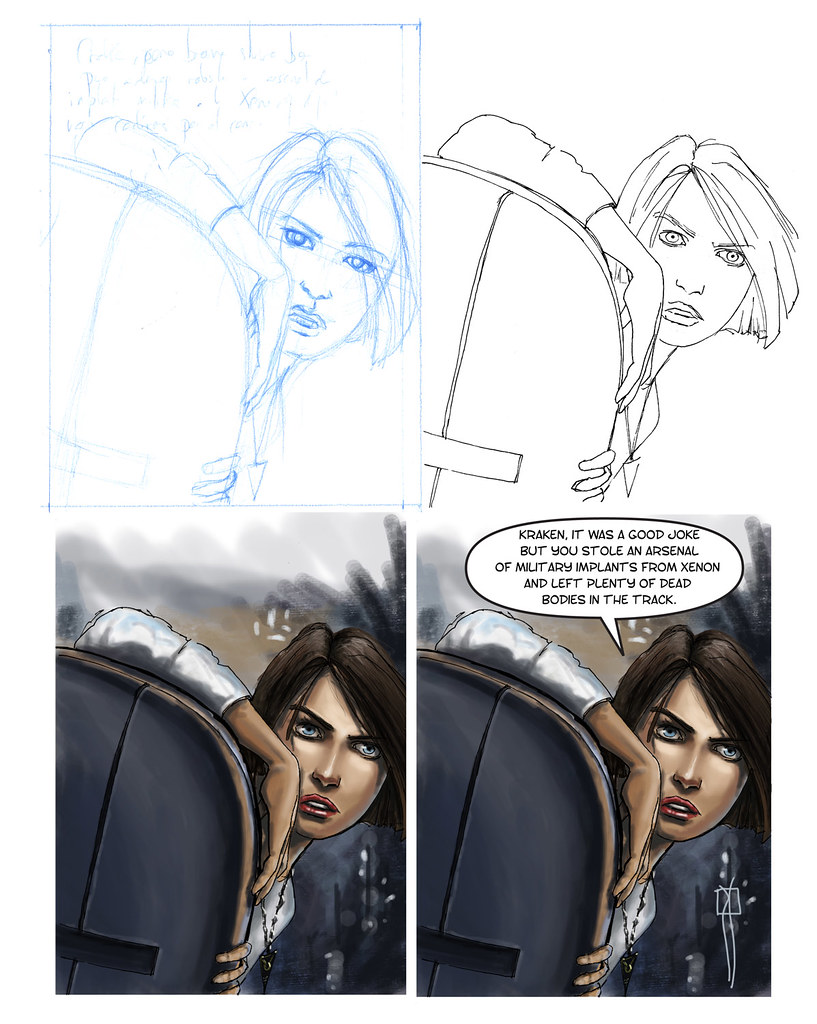
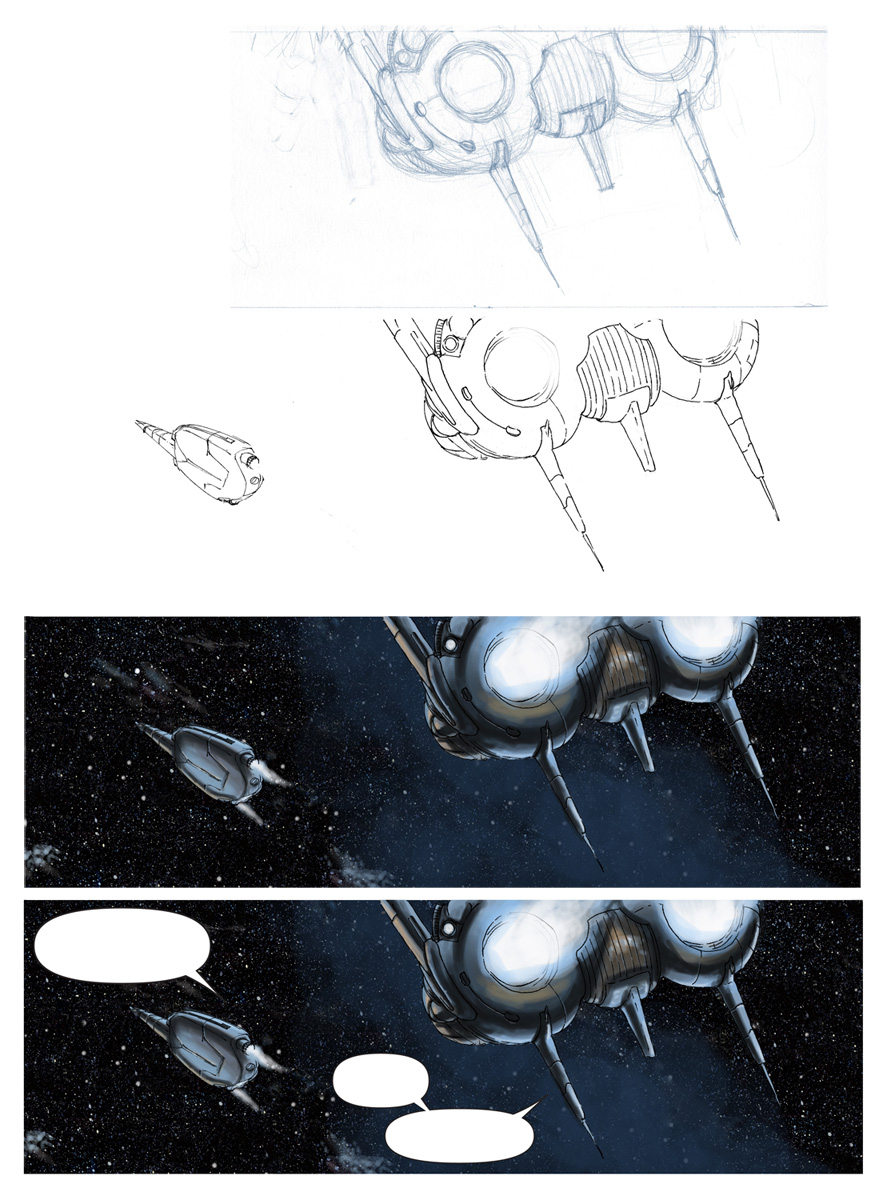
1.-Lo primero es tener el dibujo a lápiz y en azul (a veces lo dibujo con lápiz azul, pero lo normal es que haga el dibujo a lápiz de grafito y luego lo escanee y lo imprima en azul).
2.- Sobre el dibujo en azul lo paso a tinta con rotulador de 0.1 o 0.2 mm
3.- Lo vuelvo a escanear y con el photoshop filtro el color azul para eliminarlo quedando solo el trazo de rotulador.
4.- Con el photoshop comienzo a pintar la viñeta. El dibujo entintado lo coloco en la primera capa (modo multiply para que sea como una transparencia). Lo hago con una tableta gráfica Wacom tamaño A6 (tamaño foto) y por capas, el fondo por un lado, los personajes por otro.
Generalmente pinto igual que con un pincel, a base de trazos de color, como si fuera acrílico.
5.- Una vez terminada la página, lo paso a Adobe illustrator, para añadirle los bocadillos y los textos.
Así es como dibujo yo, pero no se el resto de la gente lo hace igual.
Espero que le sirva a alguien para algo.


I have asked how I make the comics. I will try to explain the process :
1.-The first thing is to have the pencil drawing and blue (sometimes I draw with a blue pencil, but I use to make the drawing with a graphite pencil and then I scanned it and printed in blue).
2 .- Once I have the drawing in blue I inking it with a 0.1 or 0.2 mm marker.
3 .- I scan the drawing again and use a filter to erase de blue ink in photoshop leaving only the stroke of pen.
4 .- With photoshop I start to paint the drawing. The ink drawing I place it in the first layer (multiply mode to be like a transparency). I do it with a Wacom graphics tablet A6 size (picture size) and layered, the bottom in one layer and the characters on the other.
Usually I paint like a brush, based on strokes of color, like acrylic.
5 .- Once I have the page, step by Adobe Illustrator, to add the balloons and texts.
This is how I picture, but not other people do the same.

Publicado en http://elblogderafan.blogspot.com/

lunes, 25 de octubre de 2010

pencil drawing proccess - proceso de dibujo a lapiz


Aquí dejo otro vídeo hecho a base de escanear el dibujo en distintas fases del proceso.
La música es una versión del clásico de sugarcubes "Birthday" interpretada por Jackie Oates.

Here I post another video made from scanning the drawing at various stages of the process.
Music is a version of the Sugarcubes "Birthday" sung by Jackie Oates.

sábado, 16 de octubre de 2010

female face proportions./ proporciones de la cara femenina.

woman face proporcions

Este es un estudio básico de las proporciones de un rostro femenino y un ejemplo de dibujo hecho con estas proporciones.

Yo comienzo siempre con un círculo. Dibujo el eje vertical y horizontal y luego marco la línea de la nariz, final de la frente y mentón. La misma medida para las tres y para el final de las cejas.
Yo siempre utilizo estas marcas básicas cuando dibujo una cara. Otra medida que no he marcado pero que suelo comprobar es que la anchura de los ojos sea igual a la distancia entre ellos.

This is a basic study of the proportions of a female face and an example of drawing made with these proportions.

I always start with a circle. Draw vertical and horizontal axis and then the line under the nose end of the forehead and chin. The same measure for the three and by the end of the eyebrows.
I always use these basic marks when drawing a face. Another measure that I have not checked but I usually see is that the width of the eyes is equal to the distance between them.

lunes, 11 de octubre de 2010

drawing tools / herramientas de dibujo

drawing tools

Lo bueno de esta afición es que es bastante barata. Yo con lo que muestro en la foto tengo suficiente. Paso a describirlo:

Papel: normalmente suelo trabajar en papel A3 (42x29 cms ). Actualmente trabajo con papel de 190 gr/m2 tipo geler (que no se lo que es), apto para grafito y tinta aunque de vez en cuando dibujo en un folio y también queda bien.

Lápices: Hay varias casa que venden estuches con 12 lápices de distintas durezas. Cuando se me gastan voy comprando sueltos. Los últimos que he comprado son de Fabell-Castell.

Goma de borrar: es muy importante que la goma sea buena y que no deje mancha al borrar. Hay que limpiarla a menudo. La que mejor me está funcionando es una ergonómica de Faber-Castell.

Brocha: Cuando borras, es mejor no eliminar los restos con la mano por que puedes manchar el dibujo. Es mejor una brocha. La que yo uso es de un set de maquillaje.

Sacapuntas: Vale casi cualquiera. Para lápices muy blandos (4B en adelante) es mejor afilar los lápices con un cuchillo ya que es sacapuntas puede romper la mina.

The good thing about this hobby is that it is fairly inexpensive. I have enough with the things I show in the photo. Step to describe:

Paper: I usually work on A3 paper (42x29 cm 16.5
'x11.4' inches). I currently work with paper of 190 g/m2 Geler type (which I don't know what it is), suitable for graphite and ink and I occasionally work on a paper sheet and looks good.

Pencils: There are several home selling kits with 12 pencils of different hardnesses. also sold loose. The last ones I bought were Fabell-Castell.

Eraser: It is very important that the rubber were good to don't stain the paper. Should be cleaned often. For now the best rubber for me is an ergonomic Faber-Castell rubber.

Brush: When you erase, it is best not to remove the remains by hand because you can spot the picture. Better a brush. The one I use is a set of makeup.

Sharpener: almost all on them works fine. For very soft pencils (4B and upper) is better sharpen pencils with a knife because a sharpener can break the mine.

martes, 5 de octubre de 2010

asian eye

asian eye-shape

He unido estos dos dibujos para ver la diferencia entre los ojos asiáticos y los occidentales.
Se puede ver la variación en la forma del ojo, mucho mas suave en el asiático así como la casi desaparición de las pestañas que quedan como tapadas por el párpado. No tenía muy claro que se apreciara la diferencia hasta que los he puesto juntos.


I've attached two eye to see the difference between Asian and Western eyes.
You can see the variation in the shape of the eye, much milder in the asian one and the near disappearance of the eyelash which remain covered by the eyelid. I was not sure about the diference until I've put them together.

lunes, 20 de septiembre de 2010

woman with a coat/ mujer con abrigo

girl-making of

Se puede ver dibujo completo en este enlace. Aquí simplemente he superpuesto el encaje inicial con el dibujo terminado para poder ver como empecé y como ha quedado terminado. Es un sistema sencillo para ver el proceso.


You can see de drawing finished in this post. Here I simply overlaid the original fit with the drawing ended as I began to see as it has been completed. It is a simple way to see the process.

domingo, 5 de septiembre de 2010

drawing a nose / dibujando una nariz

Baseline

He dejado las líneas básicas a la hora de dibujar la nariz y los ojos. A parte de la silueta también marco las líneas de los ojos para que encajen bien así como alguna linea de sombra. Cuando en encaje está terminado, intento borrar las líneas auxiliares y comienzo a sombrear.

I've post the basic lines when drawing the nose and eyes. I do the main lines and also the positión of the eyes that fit well and a shadow line. When lace is finished, I try to delete the auxiliary lines and start shading.

martes, 31 de agosto de 2010

making a drawing / dibujando


Este es un dibujo que me ha costado unas tres horas. Está hecho sobre papel A4 (tamaño folio) y para conseguir la continuidad lo he escaneado 8 veces durante el proceso. Generalmente este es proceso que sigo a la hora de hacer un dibujo. Hago el encaje y luego, después de dar un tono general suelo sombrear con los tonos definitivos de derecha a izquierda (principalmente porque soy zurdo y de otro modo emborronaría lo ya dibujado).


This is a drawing which takes me about three hours. It's made on A4 paper size and I scanned it eight times during the process. Normally this is a process that I follow when making a drawing. I fit the figure and then, after giving an overall tone I start to shaded with final tones since right to left (mainly because I am left handed and I could stain the already drawn).

martes, 24 de agosto de 2010

drawing woman faces / dibujando caras de mujer

face sketches

He dibujado los primeros pasos a la hora de dibujar caras, en este caso caras de mujer. He dejado las lineas auxiliares así como el estudio previo para ver que forma tiene.
Normalmente, una vez está todo encajado (ojos, boca, nariz etc) borro las líneas auxiliares y comienzo a sombrear. Este es un ejercicio que sirve para mejorar el encaje y que no empieces a sombrear un dibujo que no esté bien. Lo mejor es hacer cientos de ellos, hasta coger soltura.

I've drawn the first steps to drawing women's faces. You can see the reference lines and the previous study to see the basic shape.
Usually, once everything is its place (eyes, mouth, nose, etc) I delete the reference lines and start shading. This is an exercise to improve the face fit drawing. The best is make hundreds of them until you can do them easily.

martes, 17 de agosto de 2010

composition I / composición I

composition 1

Como ya comenté en el anterior post la composición es muy importante. Un dibujo puede tener una técnica perfecta pero si algo no está en su sitio el dibujo pierde el encanto. Una opción a parte de las que ya comenté es antes de comenzar a sombrear dejar el dibujo y hacer otra cosa. Luego volver a verlo, como si fuera la primera vez. Sueles encontrar cosas que antes no habías visto (normalmente fallos). Probarlo.

As I tolad in the previous post the composition is very important. A drawing can have a perfect technique but if something is not in the right place the drawing can lose its charm. One other option to add to the previous post is before you start shading, stop drawing and do something else. After that, you can look at it again.You tend to find things that had not seen before (usually errors). Try it.

viernes, 13 de agosto de 2010

drawing eyes II/ dibujando ojos II

woman eyes

Hice esta montaje hace algún tiempo. Es el mismo dibujo escaneado en varias fases del proceso.
Creo es es muy importante antes de empezar a sombrear que la composición sea correcta. Es mejor pasar mas tiempo encajando el dibujo antes de sombrear que darte cuenta al final que un ojo está mas alto que el otro o es mas grande. Es bueno alejarse un par de pasos para verlo de lejos incluso verlo boca abajo o enseñárselo a alguien. En mis dibujos hay errores que no los veo hasta que no cambio mi forma de mirarlo.
En otro post explicaré que es lo que me parece importante en este dibujo.

I made this composition for some time ago. It's one drawing scanned at various stages of the process.
I think it is very important before you start shading it that the composition is correct. It is better to spend more time fitting the drawing before shading to realize at the end that one eye is higher than the other or is larger. It's good to get away a few steps away to see it or even see it upside down or show it to someone. Usually I don't realize of my drawing errors until it changed my way of looking at it.

In another post I'll explain what I think is important in this drawing.

sábado, 7 de agosto de 2010

light / luz

light

Aquí dejo tres dibujos con distintos puntos de luz. El primero con luz inferior, el segundo con superior y el tercero sin sombra.
La luz es muy importante en un dibujo. Es lo que le da el volumen y realismo, si es eso lo que queremos.

Here I post with three drawings with different points of light. The lower light first, second one with upper light and third with no shadow.
The light is very important in a drawing. It is what gives the volume and realism, if that's what we want.

sábado, 31 de julio de 2010

drawing lips I/ dibujando labios I

lips

Estos son los detalles que suelo tener en cuenta a la hora de dibujar unos labios.
El tono intento que no sea homogéneo para darle volumen a la forma. En este caso la luz viene de frente por lo que en centro está mas claro que los lados. Las arrugas en los labios les doy curvatura que realza el volumen. La línea que separa los labios no suele ser recta sino que se eleva en el centro.
El resto está indicado en el dibujo.
Espero que os sea de utilidad.

These are the details I usually have in mind when drawing lips.
The tone is not homogeneous try to give volume to the lips. In this case the light comes from the front so that the center is more clear than the sides.
The wrinkles on the lips: I give curvature that enhances the volume. The line separating the lips is usually not straight but rises in the center.
The rest is indicated in the drawing.
I hope you find it useful.

viernes, 23 de julio de 2010

drawing clothes II / dibujando ropa II

drawing clothes II

Aquí dejo el proceso de dibujo de un detalle de una camisa en cuatro pasos. El último paso lo único que he hecho es borrar alguna zona para obtener luz y oscurecer un poco las zonas de mas sombras.

Here is the process of drawing of a detail of a shirt in four steps. The last step I've erased the lighted areas and I've darkened a bit more the shadows.

viernes, 16 de julio de 2010

drawing clothes I / dibujando ropa I

drawing clothes

Muchas veces el detalle es lo que le da vida al dibujo aunque es cuestión de gustos. La topa, sin ser muy complicada es uno de los sitios en donde el dibujo puede ganar mucho.
A parte de las sombras de los pliegues, las lineas, puntos o cualquier motivo que sigua la curva de la tela le da mucho realismo.
Aquí dejo algunos ejemplos en donde se ve el resultado de dar textura a la ropa.
En posteriores post mostraré el este proceso.


In my opinion, the detail is what gives life to the drawing. The clothes without being too complicated is one of the sites where the drawing can improve a lot.
Besides from the shadows of the folds, lines, dots or whatever reason that follow the folds of the cloth, gives a lot of realism.
Here I post some example where you con see the result is to give texture to the clothes.
In next post I'll show this process.

martes, 13 de julio de 2010

drawing proccess/proceso de dibujo

wind-proccess
Este es el proceso de un dibujo que acabé la semana pasada el cual ya publiqué.
Normalmente hago unos tonos medios para ver el volumen del conjunto y luego paso a dibujar algunas zonas en negro (en este caso el pelo) para finalmente subir el tono del resto para que el conjunto quede equilibrado. La imagen original es bastante grande por lo que si pincháis en ella podéis acceder a ella en su tamaño original.

This is the process of a drawing that I ended last week which has already published.
I usually start wiht middle tones to see the main volumes and then move to draw some black areas (in this case, the hair) and finally I made the rest drawing trying to get the right balanced. The original image is large enough so see the details so if you click on it you can access at its original size.

sábado, 10 de julio de 2010

eye sketches / bocetos de ojos

eye sketches
Una de las cosas necesarias para aprender a dibujar en practicar. Hay que hacer cien bocetos malos para que salga uno bueno pero no hay otra manera. Estos son algunos bocetos rápidos que he hecho para ir practicando.


One of the things needed to learn to draw is try. You might do a hundred bad drawings before you draw a good one but that's the way. Here it is some eyes sketches to improve them.

miércoles, 7 de julio de 2010

testing erasers / probando gomas de borrar

testing eraser

Para hacer la prueba he usado una goma de borrar STAEDTLER Mars plastic, una de Faber Castell, ergonómica y dos de la casa milan, modeloas 324 la primera y 118 la última.
Lo primero que tengo que decir es que la goma ha de estar siempre limpia. He estropeado varios dibujos por intentar borrar con una goma y hacer un borrón imposible de eliminar.
Podéis pinchar en la foto para ver los resultados y opinar vosotros mismos.
Yo prefiero la nº 2 Faber Castell ergonómica. Aunque borra prácticamente igual que la staedtler, al ser mas fina puede borrar líneas finas o areas muy pequeñas lo cual viene muy bien a la hora de obtener luces muy finas.


To make the test I used an eraser STAEDTLER Mars plastic, ther from Faber Castell, ergonomic and two from Milan company, models 324 and 118 the first the last.

The first thing I have to say is that the eraser has to be clean. I ruined several drawings for trying to erase with a dirty eraser and make a stain impossible to remove.
You can click on the picture to see the results and think you yourself.
I prefer the Faber Castell ergonomic. Although virtually is as good as STAEDTLER eraser, you can erase fine lines or very small areas which comes in handy when lights get very thin.

domingo, 4 de julio de 2010

drawing the hair / dibujando el pelo

drawing hair


Voy a intentar explicar el proceso que sigo para dibujar un peinado.
1.-Comienzo con unas lineas generales para marcar la forma final.
2.- Comienzo a sombrearlo con un lapices 4H y 2H para obtener un tono homegéneo. Esta base me sirve de fondo para luego obtener varios tonos de gris con lo que se consigue que siempre se vea color y no queden huecos blancos.
3.-Sobre esa base comienzo a sacar los tonos finales con 2B, 4B y 6B. Unas zonas negras y otras con mechones de pelo.
4.- Finalmente acabo de ajustarlo con el resto del dibujo y acabo con los detalles como algún cabello suelto.
Mas o menos es el proceso que sigo.


I'm going to explain the process I use to draw a hairstyle.
1.-I begin with some general lines for the see the shape.
2 .- Then, I start to shade with a 4H and 2H pencils to achieve an uniform tone. This base serves as a background for me then get various shades of gray as and avoid the white holes.
3.-On that basis beginning to draw the shadows with 2B, 4B and 6B pencils. I do some black areas and draw other areas with tufts of hair.
4 .- Finally just fit with the rest of the drawing and make the details just like some hair down.
More or less that's the way.

miércoles, 30 de junio de 2010

a gull, two techniques/ una gaviota, dos técnicas

a gull, two techniques


He probado a dibujar dos gaviotas de forma diferente. En la primera he utilizado únicamente un lápiz 4B. El 4B es bastante blando por lo que se pueden obtener tonos muy oscuros dependiendo de la presión que ejerzas.
La segunda gaviota la he hecho utilizando varios lápices. He comenzado con un 4H, como base, con el que se obtiene un tono gris claro bastante homogéneo y luego he pasado a un H, 2B y he acabado con el 4B para las sombras mas oscuras.
En el primer ejemplo se pierden un poco los detalles y en las zonas mas oscuras no cubre todo el papel aunque cuanto mas satinado sea éste, menos se notará.
Haré la misma prueba con papel mas rugoso.

I've drew differently two seagulls. In the first one I used only a 4B pencil. The 4B pencil is quite soft so you can get very dark tones depending to the pressure exerted.
In the second one gull I've been using various pencils. I started with a 4H pencil, as a basis with which you get a fairly uniform gray tone and then I changed to a H, 2B and I ended with the 4B pencil for darker shadows.
The first example has less detail and darker areas aren't totally covered. The more glossy paper, the less noticeable the diference.
I'll do the same test with a more rough paper.

domingo, 27 de junio de 2010

drawing eyes I /dibujando ojos I

como dibujar un ojo I

A la hora de dibujar un ojo, es importante darle expresión. Influye tanto la posición de las cejas, como la abertura del ojo o la posición el iris. Aquí dejo tres formas básicas de ojos con tres expresiones distintas. Arriba se ve el encuadre de los mismos antes de empezar a dibujarlos. Si la base falla, el dibujo fallará. El brillo del ojos o las pestañas son los detalles que le dan vida de los cuales hablaré en otro post.

Yo aconsejo coger una revista de moda cualquiera e ir practicando.

When you draw an eye, is important give it expression. Influences both the position of the eyebrows, such as eye opening or position of the iris. Here it is three basic shapes of eyes with three different expressions. On top you can see the shape before starting to draw. If this fails, the final drawing would fail too. The brightness of the eyes or eyelashes are the details that give life to which I will discuss in another post.


I recommend or take any fashion magazine and start to practice.

jueves, 24 de junio de 2010

The pencils I / Los lápices I

the hardness of the pencils

Aquí se puede ver la diferencia entre los distintos lápices. Desde el 6H, uno de los mas duros hasta el 7B que es uno de los mas blandos. Dependiendo de la etapa en que se encuentre el dibujo iremos pasando a lápices mas blandos. En estas muestras se puede ver la textura del papel, lo que hace que el lápiz no cubra toda el área quedando huecos blancos. En otro post indicaré como evitar esto.


Here you can see the difference between the pencils. From 6H, one of the hardest to 7B which is one of the most soft. You have to start drawing with hardest ones to finish with the most soft pencils. In these samples you can see the texture of the paper, that's because the pencil does not cover the entire area leaving white gaps. In another post I'll explain how to avoid this.

martes, 22 de junio de 2010

proceso de dibujo-viento


Este es el proceso de dibujo de uno de mis trabajos. Realmente son cuatro imágenes que escaneé mientras iba realizando el dibujo. Lo suelo hacer a menudo así que iré publicando videos conforme los prepare.

This is the process of drawing from one of my jobs. There really are four images that I scanned while I was doing the drawing. I usually do often so I will publish videos.

miércoles, 16 de junio de 2010

primer video


Esta es mi primera prueba de video de realización de un dibujo. No lápiz. Es un dibujo digital hecho con tableta gráfica pero la técnica es similar. Cuando tenga un rato probaré con uno un poco mas complicado.


This is my first video test of making a drawing. It's not a pencil drawing. It is a digital drawing made on a wacom tablet but the technique is similar. I'll try with another a few more complicate.