martes, 17 de agosto de 2010

composition I / composición I

composition 1

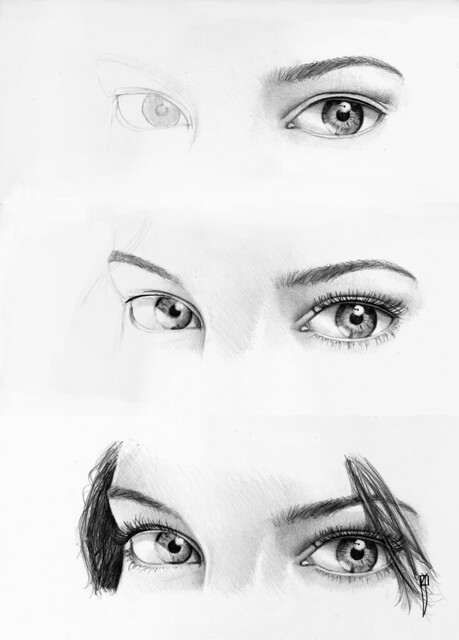
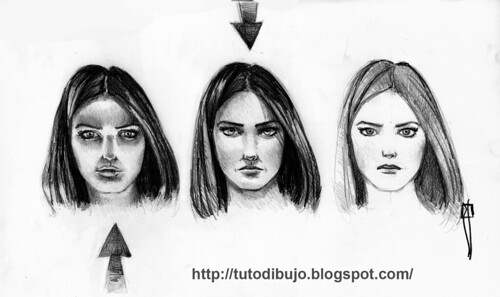
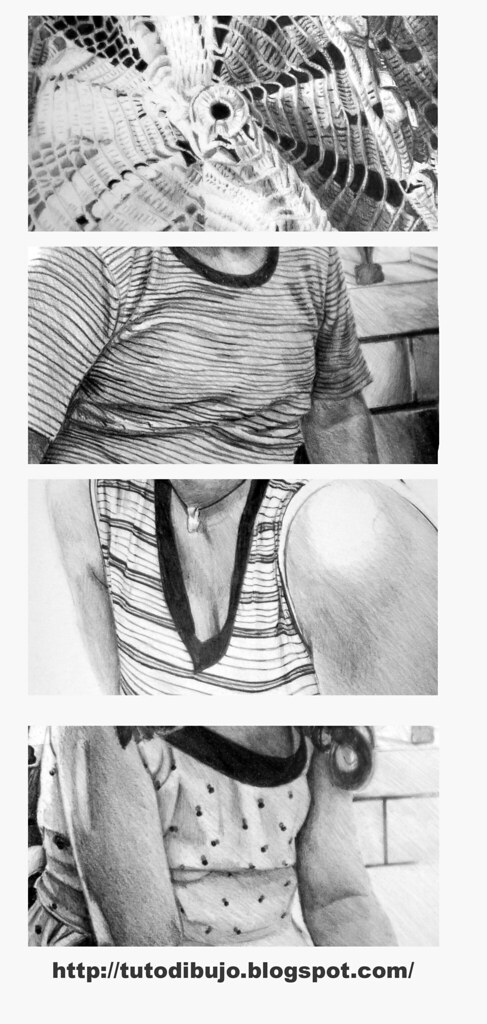
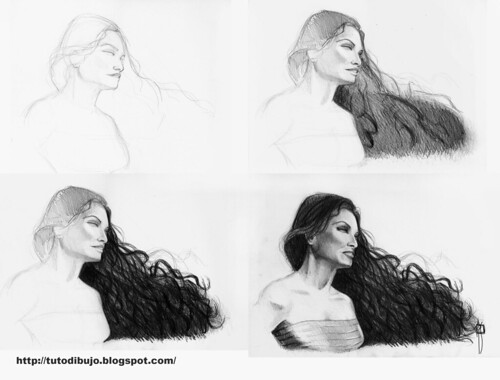
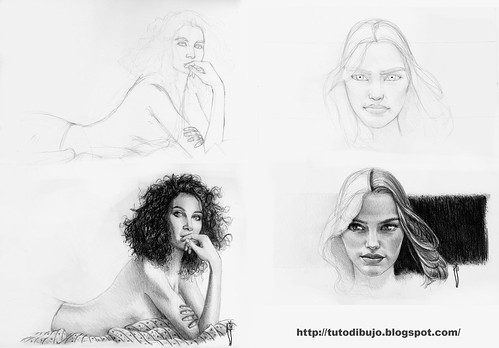
Como ya comenté en el anterior post la composición es muy importante. Un dibujo puede tener una técnica perfecta pero si algo no está en su sitio el dibujo pierde el encanto. Una opción a parte de las que ya comenté es antes de comenzar a sombrear dejar el dibujo y hacer otra cosa. Luego volver a verlo, como si fuera la primera vez. Sueles encontrar cosas que antes no habías visto (normalmente fallos). Probarlo.

As I tolad in the previous post the composition is very important. A drawing can have a perfect technique but if something is not in the right place the drawing can lose its charm. One other option to add to the previous post is before you start shading, stop drawing and do something else. After that, you can look at it again.You tend to find things that had not seen before (usually errors). Try it.

viernes, 13 de agosto de 2010

drawing eyes II/ dibujando ojos II

woman eyes

Hice esta montaje hace algún tiempo. Es el mismo dibujo escaneado en varias fases del proceso.
Creo es es muy importante antes de empezar a sombrear que la composición sea correcta. Es mejor pasar mas tiempo encajando el dibujo antes de sombrear que darte cuenta al final que un ojo está mas alto que el otro o es mas grande. Es bueno alejarse un par de pasos para verlo de lejos incluso verlo boca abajo o enseñárselo a alguien. En mis dibujos hay errores que no los veo hasta que no cambio mi forma de mirarlo.
En otro post explicaré que es lo que me parece importante en este dibujo.

I made this composition for some time ago. It's one drawing scanned at various stages of the process.
I think it is very important before you start shading it that the composition is correct. It is better to spend more time fitting the drawing before shading to realize at the end that one eye is higher than the other or is larger. It's good to get away a few steps away to see it or even see it upside down or show it to someone. Usually I don't realize of my drawing errors until it changed my way of looking at it.

In another post I'll explain what I think is important in this drawing.

sábado, 7 de agosto de 2010

light / luz

light

Aquí dejo tres dibujos con distintos puntos de luz. El primero con luz inferior, el segundo con superior y el tercero sin sombra.
La luz es muy importante en un dibujo. Es lo que le da el volumen y realismo, si es eso lo que queremos.

Here I post with three drawings with different points of light. The lower light first, second one with upper light and third with no shadow.
The light is very important in a drawing. It is what gives the volume and realism, if that's what we want.

sábado, 31 de julio de 2010

drawing lips I/ dibujando labios I

lips

Estos son los detalles que suelo tener en cuenta a la hora de dibujar unos labios.
El tono intento que no sea homogéneo para darle volumen a la forma. En este caso la luz viene de frente por lo que en centro está mas claro que los lados. Las arrugas en los labios les doy curvatura que realza el volumen. La línea que separa los labios no suele ser recta sino que se eleva en el centro.
El resto está indicado en el dibujo.
Espero que os sea de utilidad.

These are the details I usually have in mind when drawing lips.
The tone is not homogeneous try to give volume to the lips. In this case the light comes from the front so that the center is more clear than the sides.
The wrinkles on the lips: I give curvature that enhances the volume. The line separating the lips is usually not straight but rises in the center.
The rest is indicated in the drawing.
I hope you find it useful.

viernes, 23 de julio de 2010

drawing clothes II / dibujando ropa II

drawing clothes II

Aquí dejo el proceso de dibujo de un detalle de una camisa en cuatro pasos. El último paso lo único que he hecho es borrar alguna zona para obtener luz y oscurecer un poco las zonas de mas sombras.

Here is the process of drawing of a detail of a shirt in four steps. The last step I've erased the lighted areas and I've darkened a bit more the shadows.

viernes, 16 de julio de 2010

drawing clothes I / dibujando ropa I

drawing clothes

Muchas veces el detalle es lo que le da vida al dibujo aunque es cuestión de gustos. La topa, sin ser muy complicada es uno de los sitios en donde el dibujo puede ganar mucho.
A parte de las sombras de los pliegues, las lineas, puntos o cualquier motivo que sigua la curva de la tela le da mucho realismo.
Aquí dejo algunos ejemplos en donde se ve el resultado de dar textura a la ropa.
En posteriores post mostraré el este proceso.


In my opinion, the detail is what gives life to the drawing. The clothes without being too complicated is one of the sites where the drawing can improve a lot.
Besides from the shadows of the folds, lines, dots or whatever reason that follow the folds of the cloth, gives a lot of realism.
Here I post some example where you con see the result is to give texture to the clothes.
In next post I'll show this process.

martes, 13 de julio de 2010

drawing proccess/proceso de dibujo

wind-proccess
Este es el proceso de un dibujo que acabé la semana pasada el cual ya publiqué.
Normalmente hago unos tonos medios para ver el volumen del conjunto y luego paso a dibujar algunas zonas en negro (en este caso el pelo) para finalmente subir el tono del resto para que el conjunto quede equilibrado. La imagen original es bastante grande por lo que si pincháis en ella podéis acceder a ella en su tamaño original.

This is the process of a drawing that I ended last week which has already published.
I usually start wiht middle tones to see the main volumes and then move to draw some black areas (in this case, the hair) and finally I made the rest drawing trying to get the right balanced. The original image is large enough so see the details so if you click on it you can access at its original size.

sábado, 10 de julio de 2010

eye sketches / bocetos de ojos

eye sketches
Una de las cosas necesarias para aprender a dibujar en practicar. Hay que hacer cien bocetos malos para que salga uno bueno pero no hay otra manera. Estos son algunos bocetos rápidos que he hecho para ir practicando.


One of the things needed to learn to draw is try. You might do a hundred bad drawings before you draw a good one but that's the way. Here it is some eyes sketches to improve them.

miércoles, 7 de julio de 2010

testing erasers / probando gomas de borrar

testing eraser

Para hacer la prueba he usado una goma de borrar STAEDTLER Mars plastic, una de Faber Castell, ergonómica y dos de la casa milan, modeloas 324 la primera y 118 la última.
Lo primero que tengo que decir es que la goma ha de estar siempre limpia. He estropeado varios dibujos por intentar borrar con una goma y hacer un borrón imposible de eliminar.
Podéis pinchar en la foto para ver los resultados y opinar vosotros mismos.
Yo prefiero la nº 2 Faber Castell ergonómica. Aunque borra prácticamente igual que la staedtler, al ser mas fina puede borrar líneas finas o areas muy pequeñas lo cual viene muy bien a la hora de obtener luces muy finas.


To make the test I used an eraser STAEDTLER Mars plastic, ther from Faber Castell, ergonomic and two from Milan company, models 324 and 118 the first the last.

The first thing I have to say is that the eraser has to be clean. I ruined several drawings for trying to erase with a dirty eraser and make a stain impossible to remove.
You can click on the picture to see the results and think you yourself.
I prefer the Faber Castell ergonomic. Although virtually is as good as STAEDTLER eraser, you can erase fine lines or very small areas which comes in handy when lights get very thin.

domingo, 4 de julio de 2010

drawing the hair / dibujando el pelo

drawing hair


Voy a intentar explicar el proceso que sigo para dibujar un peinado.
1.-Comienzo con unas lineas generales para marcar la forma final.
2.- Comienzo a sombrearlo con un lapices 4H y 2H para obtener un tono homegéneo. Esta base me sirve de fondo para luego obtener varios tonos de gris con lo que se consigue que siempre se vea color y no queden huecos blancos.
3.-Sobre esa base comienzo a sacar los tonos finales con 2B, 4B y 6B. Unas zonas negras y otras con mechones de pelo.
4.- Finalmente acabo de ajustarlo con el resto del dibujo y acabo con los detalles como algún cabello suelto.
Mas o menos es el proceso que sigo.


I'm going to explain the process I use to draw a hairstyle.
1.-I begin with some general lines for the see the shape.
2 .- Then, I start to shade with a 4H and 2H pencils to achieve an uniform tone. This base serves as a background for me then get various shades of gray as and avoid the white holes.
3.-On that basis beginning to draw the shadows with 2B, 4B and 6B pencils. I do some black areas and draw other areas with tufts of hair.
4 .- Finally just fit with the rest of the drawing and make the details just like some hair down.
More or less that's the way.